Posted November 13th, 2025
Written by Hillary Heckler, Country Farm and Home
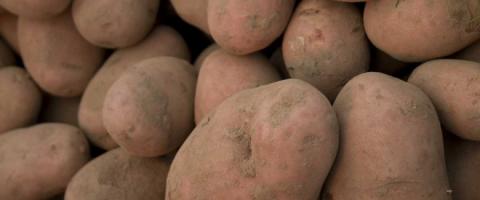
Few crops are as rewarding to grow as potatoes. From watching their little eyes open and emerge from the soil after planting to peaking around the base of the plants to see the first tubers forming to finally harvesting a bountiful crop of fresh potatoes…no matter if it’s your first or 50th crop the whole process is magical. Got questions? We’ve got answers….
Dear Tater Whisperer:
What is a ‘seed’ potato?
With the exception of plant breeders, we propagate potatoes vegetatively or asexually; potatoes of the same variety are genetically identical to their parents. So, the ‘seed’ that you’ll find to grow potatoes looks like, well, a potato. However, there are some significant differences that separate seed potatoes from the ones you find in the grocery store.
First, most potatoes in the grocery store have been treated with a sprout-inhibitor that prevents the potatoes’ eyes from developing while in storage and on the shelf. Seed potatoes are NEVER treated with sprout inhibitors. This alone can be the difference between growing potatoes successfully or not.
Second, any seed potatoes you buy should be CERTIFIED DISEASE FREE. Potatoes intended to be sold for seed are tested for a panel of diseases before receiving a government-issued ‘disease-free’ certificate. Any seed lots that test positive are not certified and are not sold. Without this assurance, you could unknowingly introduce diseases into your crop and your soil that could persist for many years. So, if you like growing potatoes, don’t risk planting seed from questionable sources because there’s no way of knowing what else you’ll be planting.
Can I save my own seed from my potato crop?
I wouldn’t recommend it. It’s not so much that it can’t be done, it’s that it can’t be done well here in the Southeast without incurring some significant risks. Risks include transmitting diseases from saved seed to the next crop and losing your seed crop in storage because the tubers are not technically mature.
Seed potatoes have been grown to physical maturity meaning they were cured in the ground before harvest and are able to be stored successfully to produce next year’s crop. You’ll notice that most seed potatoes come from northern latitudes like Colorado, Idaho and Maine. These climates have the kind of weather potatoes need to produce high quality, disease-free seed crops.
The potatoes we grow in the Southeast are considered ‘new’ potatoes, regardless of size, because they’re being harvested off plants that are still alive. These ‘new’ potatoes have very fragile skins, are easily damaged and will not cure in the ground due to the heat of summer soils. Lucky for us, we’re just in it for the goods and can still enjoy quality potatoes for food if not for seed.
What kind of fertilizer should I use with potatoes and how much?
GET A SOIL TEST before adding anything to your soil. Like salting a soup, once the salt’s in, you can’t take it out. The same principle applies to amending agricultural soils. How do you know what you need if you don’t know what you have? Soil testing will answer those questions and provide amendment rate recommendations based on your results. North Carolina offers free soil testing from April to November; from December to March soil tests are $4.00 per sample, which is still a bargain. Stop by your local Cooperative Extension office or Country Farm & Home to get soil sample boxes and instructions on how to take a soil sample.
Potatoes prefer the following conditions:
- pH: between 5.0 – 6.5; lower pH will minimize potato scab
- Soil that has been prepared & amended with compost & Macronutrients (Phosphorus & Potassium) the following Fall
- No actively decomposing green matter!
- Do not plant into soil that has recently been in sod or pasture, within the last 3-12 months. Wire worms reside in sod & can ruin your crop with their feeding. Just wait until the grass is gone & you’ve worked the space with tillage to disrupt their life cycle.
Potatoes need to eat, too!
Potatoes will remove the following soil nutrients per 1,000 sq. ft. or per acre.
- Nitrogen: 2# per 1,000 sq. ft. __ 90-100# per acre
- Phosphorus: 1# per 1,000 sq. ft. __ 40-50# per acre
- Potassium: 3.5# per 1,000 sq. ft. __ 150-170# per acre
These numbers represent 100% pure N-P-K; keep in mind that when you look at soil amendments, the numbers you see represent the percent N, P, or K in that bag. For example, a 50# bag of (10-10-10) has 5# each of N-P-K; the remainder of the weight is comprised of materials that are not N, P or K.
You’ll need to replace these nutrients with amendments, mulches, compost or composted manure regularly. Monitor your soil health and fertility with regular soil testing and use the soil test recommendations to help you figure out what you need to add and in what quantity.
How much should I plant?
How much do you want to eat or sell? Start with a desired poundage and work backwards if space isn’t an issue or start with the space you have available and calculate how much seed you’ll need to purchase.
Here are the basic details so you can figure out how much you want to grow...
Seed Potato Weight:
1 ½ - 2 oz.
Small seed potatoes can be planted as-is
Larger seed potatoes need to be cut into several pieces
Number eyes per seed piece:
At least one, more is better
Plant seed with eyes facing up
1 pound seed plants 6’– 8’ bed
Plant Spacing:
8”-12” between standard varieties
12”-16” between fingerling varieties
Planting closer yields smaller potatoes
Planting further apart yields larger potatoes
Yield: 1:10 seed weight to pounds of crop harvested
If grown in well balanced soil, Potatoes will typically produce on a 1:10 ratio of pounds of seed planted to pounds of potato crop harvested. If your yields are higher, great job!! Your soil’s in great shape & the taters are thanking you with their abundance. If your yields are lower, it could be a varietal characteristic or an indication that something is out of balance in your soil. GET A SOIL TEST to help you figure out what’s deficient in your soil so you can amend for your next plantings.
How do you plant potatoes?
2-6 Weeks Before Planting:
Potatoes prefer soil that has been amended in the Fall with your amendment(s) of choice &/or compost. Some growers will cover crop spring potato beds with Canola/Rape, oats or barley_ something that will hold the soil over the winter but be easy to kill and incorporate before planting their potatoes. Other growers prefer to leave spring potato beds fallow and weed-free for ease of getting into the field as early as possible. Whatever bed preparation method you choose, potatoes DO NOT like to be next to actively decomposing green matter. Leave time between tillage and planting to allow green matter to break down; 2-6 weeks is a good time frame.
2 Weeks Before Planting:
In the southeast, we typically plant our potatoes in March. Consider waking up your potatoes in mid-February by green-sprouting them for several weeks before planting. Place whole seed potatoes one or two layers deep in a box then leave them in a warm_60-85 degrees_ dark place to encourage their eyes to pop. Be careful when handling them to avoid breaking off sprouted eyes.
Time to plant!! The day of:
Prepare Seed:
Seed potatoes that are 1 ½ - 2 oz. do not need to be cut. Seed over 2 oz. can be cut into smaller pieces; think the size &/or weight of an egg as your goal. Try to have at least 2 eyes per seed piece; one will do if that’s all you can find. You can cut the potato any which-way to achieve this. Avoid cutting eyes if you can when making your cuts. Some folks like to let seed pieces dry before planting. This isn’t necessary, but you can if you’d like. Once your seed pieces are cut, you’re ready to plant.
Prepare Soil:
Dig a trench in your bed about 4”-6” deep; triangle or standard hoes work well. Lay seed pieces eyes-up in the trench at 8”-12” for standard potato varieties and 12”-16” for fingerling varieties. You may wish to lay drip tape into the trench next to your seed potatoes to conserve water and to ensure that any water you put out gets to your crop and not your weeds. Cover seed (and drip tape, if used) with several inches of soil and tamp lightly….and you’re done!
Why do you hill potatoes?
Just about everyone knows you should hill potatoes, but does everyone know why?
Hilling potatoes produces the following benefits:
Weed Management:
In the southeast, potatoes are grown from March to May-July, depending on varietal days to maturity. Y’all know what else is growing March to July….WEEDS!! Oh, the weeds… You’ll have to manage those any way, you might as well go on and hill those taters in the process. Hilling uproots weeds as you pull the soil up around the potato plants.
Quality Control:
There’s a very important reason we keep potatoes in the dark. If potatoes are exposed to sunlight, they will start to photosynthesize and produce a green pigment under the skin. This ‘greening’ IS TOXIC to anything that eats it!! It’s a great strategy for the potato to avoid being eaten but not so great for us if we plan on harvesting an edible crop. Hilling potatoes ensures that forming tubers are fully covered with soil and are protected from the sun’s rays. With that in mind, if you see any potatoes at the soil line, be sure to cover them promptly to prevent greening.
Drainage:
Potatoes need water, but they don’t need to be sitting in a puddle. Depending on the weather and your soil type, we can provide the potato plants with better drainage by periodically pulling up soil around the growing stems. Heavy rains will run off into the aisles and away from the potatoes.
Yield Increase:
This is by far the most interesting bit on potatoes…
Potatoes form two types of stems; one for above-ground growth, on which we see leaves; one for below-ground growth, on which we find tubers. By covering growing leaf shoots with soil, we are creating more below-ground stem. Once a portion of the stem is buried with soil, it will produce the tuber-forming stems that will then form potatoes. Cool, huh? A bit sneaky on our part, but fascinating to observe. This is also why you may notice different sized potatoes on your plants at harvest; the longer the underground stem was under the ground translates to larger potato size and your preceding hilling activites. You can hill your potatoes 1-3 times per season/crop. Just loosen surrounding soil in the bed and pull up around the leaves and stems. Try to hill before the stems grow too long and start to flop over. You should pull between 2”-6” new soil up around the plants each time you hill. At a certain point, your hills can’t get any taller; stop hilling & let the plants do their thing until harvest.
How much water do potatoes need and when?
Potatoes need different amounts of water at different times in order to produce to the best of their ability. Generally, potatoes need between 1-2 inches of water per week; this could be provided by rain events or you to make up the difference.
Water needs for your crop throughout its life goes a little something like this…
- Planting to 30 days: Water needs not high or critical
- 30-60 days: Water critical for vegetative growth and early tuber formation
- 60-90 days: Water critical for tuber bulking
- 90-120 days: Tops begin to yellow and die back. Water needed but not excessively before harvest
How do you know when potatoes are ready to harvest?
Different varieties of potatoes have different Days To Maturity (DTM). It’s best to identify the variety you are growing and its DTM to give you an idea of when your crop will be ready to harvest. Count the days from planting to figure out target harvest dates per potato variety.
You can always dig around a bit to see how things are coming along. Generally, new potatoes will be present by day 60; they will be small and fragile. You can take a few if you just can’t wait any longer!! Most varieties will have good-sized tubers that are ready to harvest by 90 days.
In the Southeast, soils get too hot in the summer to grow great potatoes. Varieties with DTM beyond 120 days is not advisable. Shoot to have all your taters up by the end of July at the latest for best quality.
How do you harvest potatoes?
Dig, baby, dig!!
If you are growing on a small-scale, nothing is more rewarding than digging up your potato crop by hand. A digging fork or a broad fork work very well.
Start along the far edges of your bed so not to skewer your taters. Loosen soil around the mound and unearth your beauties.
Let potatoes dry off on the bed top for no more than 30 minutes or so before collecting them gently into boxes or bins. Skins will be fragile and easily damaged at this point.
Consider collecting your potatoes into the bins or boxes you intend to store them in to minimize the number of times you have to handle them. Also consider grading them in the field into various sizes before boxing them; smaller potatoes will dehydrate sooner than larger ones; having them graded makes it easy use the ones that will not hold very long first.
Store all potatoes in a cool dark place until you are ready to eat them or sell them. A light-free storage place is critical to keep potatoes from ‘greening’. DO NOT EAT green potatoes; they contain a toxin that is detrimental to the central nervous system. Any green potatoes should be discarded. No green? No problem.
How long will my harvest store?
Keep in mind that potatoes grown in the Southeast will likely be harvested before the scorching heat of summer and will not get a chance to cure in the ground. This means skins will be very fragile and the potatoes will not keep as long as those that are allowed to fully mature and cure in the ground. You can expect Southeastern crops to store 1-3 months, depending on variety, potato size and storage conditions. Past 3 months, potatoes may start to dehydrate and deteriorate in quality.
What’s eating my potato plants?!? & What can I do about it?
Pest management starts before the pests show up and continues long after the crop is harvested. Understanding what pests like, need and are attracted to will help you manage them in your garden or farm.
The general principles of pest management include:
- Don’t give them what they need_ rotate crops so over-wintered adults will not emerge to find their favorite crop waiting for them
- Scout!! 2 isn’t a problem; 2,000 is a problem. There’s a chance that beneficial insects will help you manage your insect pests, so don’t grab the big guns until you really need them.
- Identify most vulnerable life stage(s) of pest to be most effective with treatment options_ egg, larvae, pupa, adult
- Hand-collect or Crush_ Adults, eggs & larvae as much as is feasible while you are scouting to get a feel for whether or not you need to treat the crop.
- Treat Crop with Appropriate Pesticide_ Choose the right product for the right pest. Be aware of inadvertent effects of using pesticides on other insect or animal populations. Target problem areas and apply just what’s needed to treat that space/crop.
For Potatoes, the most common insect pests are Colorado Potato Beetles & Click Beetles/Wire Worms.
Colorado Potato Beetles feed on potato foliage as larvae and can really do some damage on the upper parts of young potato plants, sometimes wiping out your planting if nothing is done to control them.
Organic control options include:
- Hand pick adults & larvae; crush them, throw them into water to prevent them from flying away &/or feed them to chickens
- Crush Eggs; check under-sides of leaves
- Spinosad Products; if your CPB population gets out of control, Spinosad sprays are extremely effective at knocking back larval populations. Spinosad is a bacterium that affects insect’s nervous systems resulting ultimately in death.
Wire Worms & Click Beetles are one in the same; the wire worm is the juvenile stage of the adult Click Beetle. For some species of wire worms, it can take 5 years to become an adult click beetle! Wire worms feed underground on newly sprouted seeds and stems. Click beetles feed on pollen, nectar and other insects like aphids. Hummmm, this larval ‘pest’ has its merits as an adult. Let’s work with the wire worm. Highest concentrations of wire worms are found in sod or lawns. By avoiding planting potatoes into areas recently in sod, we can effectively avoid the wire worm’s negative effects on our crops. Just wait. It’s as easy as that!